ITP2800 – Week 5 – Building Mobile Apps

Homework for Week 5

  • Catch up on previous weeks’ readings and homework that you haven’t turned in yet
  • Continue to develop and plan your cause with a target on being able to concisely explain it for your midterm and the next Speed Geek!
  • Review the content presented in class and decide on the approach (server vs client or mixed) and the tools which you will utilize.
    • All: develop the user stories and basic mockups of your service – “iterate with pencil” before moving into fancier renderings
    • Server Developers: setup an IMified account and review the developer documentation
    • Client Developers: setup the Android SDK, then download and build the gReporter source code


Another exciting week at ITP. This week the classes was visited by Evan Henshaw-Plath aka Rabble, who both spoke of his personal experiences with mobile technology and activism, and also provided critical feedback to students on their projects during our first Speed Geek.

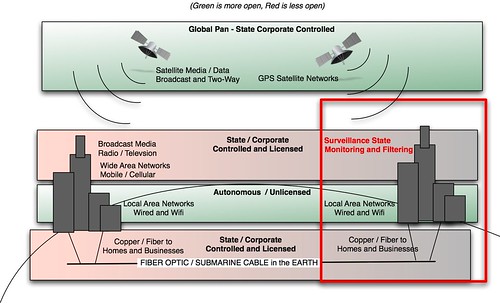
The second half of the class focused on preparing for the development of actual mobile applications and services. While students are free to choose any software or hardware approach they want, the two platforms that will be covered in class are IMified and Google Android.

Here is the audio of the second hour of class as I walk through the links and slide presentations embedded below:

Referenced links:

This first presentation provides an overview on approaching the development of mobile applications considering all of the unique factors of using a small, portable device on the go:

The second presentation uses the gReporter application to discuss the development of location and media-capture applications on the Google Android platform.

Finally, for beginning to design and mockup applications, here’s a list of solutions for the iPhone (thanks to TechJini blog)  that can also apply to Android:

  1. Use Interface Builder or Dashcode (Mac only)
  2. Use Balsamiq mockup tool (Mac, windows, linux) – http://www.balsamiq.com (http://www.balsamiq.com/blog/2009/03/01/iphone-controls-new-icons-and-much-more/)
  3. Use Omnigraffle (Mac only) and import an iPhone stencil – (http://www.omnigroup.com/applications/omnigraffle/download/ and http://www.graffletopia.com/search/iphone)
  4. Use paper and a stencil- http://www.designcommission.com/shop/iphone-stencil-kit/
  5. Use a pre-printed sketch paper – http://labs.boulevart.be/index.php/2008/06/05/sketch-paper-for-the-mobile-designer/
  6. Use photoshop and the iPhone PSD – http://www.teehanlax.com/blog/?p=1628
  7. Use Adobe Fireworks – http://blogs.adobe.com/fireworks/2008/08/iphone_gui_as_adobe_fireworks.html and http://www.building43.com/videos/2009/06/23/mockup-iphone-app-adobe-fireworks/
  8. Although not there yet, you can try http://iphonemockup.lkmc.ch/
  9. Use the stencil kit from Yahoo! which is available in a variety of formats – http://developer.yahoo.com/ypatterns/wireframes/
  10. Use the sketchbook available at http://www.mobilesketchbook.com/

ITP2800 – Week 3 – Nathan's Story, Secret Videos and Student Proposals

Homework for week 3:


Here’s what we talked about in class:

I announced my work in porting the Tor Project to Android. Tor is an “onion router” web proxy that allows web surfers in places like Iran and China get free, anonymous access to the web. Having secure, anonymous browsing that can route around censorship is a critical component of my Guardian secure smartphone project.

The story of Alan Turing and his impact on computing came up briefly and I just wanted to make sure everyone knew the amazing yet tragic story of his life. Just recently, an online, crowd-sourced petition effort pressured the British Government to issue a formal apology for causing his suicide, and countless others who were persecuted for their sexuality.

At some point in class, I drew a diagram that I quite enjoyed sharing, and will attempt to recreate here, since I unfortunately didn’t get a photo or capture it using the smart board. The drawing below is an attempt to demonstrate the various layers of network communication layers, both the physical medium and the amount of government/state and corporate control at each layer. Ultimately, the best opportunities for using networks with less control lie at the LAN layer and the Global layer…. though there are opportunities and technologies at all layers.

Spectrum Of Network Control

I also realized that I hadn’t given the class a background on myself, and decided to share a talk I had recently given at Parsons on my life and work. The presentation tells my story through the various computing hardware and devices I’ve owned, used, hacked and programmed in my life. Notice that the devices get smaller, more powerful and more connected over time. The slides are posted below, and then a video from the talk I gave at Parsons is below that.

Discover Simple, Private Sharing at Drop.io


the audio starts after a minute or so…

Finally, we reviewed week 2 homework, specifically “mobile videos shot under duress” and the first draft of proposals for the cause they’d like to work on and the technology they plan to use.

You can search #itp2800 on Twitter and ITP2800 on Delicious to see links to some of the homework.

That’s all for week 3…. leave a comment here if you have any questions or feedback.

ITP2800 – Week 1 – Slides, Whiteboards, Audio

Here are the captured whiteboard brainstorms, audio (first hour only due to technical glitches) and my slides for the week 1 class of ITP2800. All of this content is hosted and available on http://drop.io/itp2800, with class bookmarks and homework reading assignments posted at http://delicious.com/nathanialfreitas/itp2800+week1. Week 1 homework assignments are listed at the end of this post.

These images were created using the smart digital whiteboard in the classroom, which allows me to project powerpoint slides and then mark up on top of them. We collectively deconstructed the title of the course “Social Activism using Mobile Technology” with some great results.
Disclaimer: my penmanship is generally better than this, but this was a rapid fire brainstorm and the smartboard pens take a bit getting used to!

SOCIAL: People, Groups, Communicating/Community, Interaction, Casual Talking, Context+Culture, Hierarchy/Roles/Privileges, Social Justice, Shared Experiences, Socializing, Social Psychology

ACTIVISM: A Cause for ACtion, Change/Revolution, Movement/Moment, Activated, Mobilized, Organizing, Violient/Non-Violent, Action/Reaction, Strong Opinion, Resistance, Non-Passive, Participation, Protest, Direct Action, THE MAN, Leaders/Followers, Crowd Sourcing, Grassroots/Astroturfing

MOBILE: Portable, Gadget, Dispatchable, Anytime/Anywhere, Networked (People), The Network, On the Move, Personal, Social!, Remote Data, Telecommunications, Tele-vision, Tele-operation, Handy, action, Invisible, Magic, Cloud, Action!, Wireless

TECHNOLOGY: Not Nature, Not Naturally Evolved, Human Made, Stronger, Empowering, Security, FRUSTRATING, delicate, tool, unpredictable, elusive, disruptive, mediator, organically evolved, addictive, expensive->cheaper->smaller->faster, dangerous, privately owned vs. open-source, INFO, DATA, Sensors, Tricorder, Innovation, ROBOTS, SKYNET!

Here’s the raw audio of the first hour of class (syllabus review, grading, basic concepts… real exciting stuff!):

Discover Simple, Private Sharing at Drop.io

Here are the slides:

Discover Simple, Private Sharing at Drop.io

Homework
* SMS Mailing List: text ITP2800 to 41411
* Get your own Textmarks.com keyword and make it do something
* Create a hashtag on Twitter and see how many mentions you can get
* Find a mobile app (iPhone, Android, Blackberry or other) that you think is a good representation of Social Activism and post a public review of it
* Research a cause to affiliate with

Creative Commons License
Social Activism using Mobile Technology – ITP 2800 – Week 1 by Nathan Freitas is licensed under a Creative Commons Attribution-Noncommercial-Share Alike 3.0 United States License.
Based on a work at openideals.com.

Turn Your Blog Into a Native iPhone App in 10 Steps

I’m going to get down to business here without too much editorializing. The only prereq is that you have an Intel-based Mac and a medium level of skills with text editors or visual web page designers. You don’t need to know how to write Objective C or any other complex “Native App” skills. I’ll take you step-by-step through a simple process for putting together a number of free tools and technologies in order to bring your blog (or any other RSS-based feed of content) to the iPhone or iPod Touch in a super cool and quick way.

1) Download and install the iPhone Development SDK: http://developer.apple.com/iphone/

2) Launch the Dashcode application and select the “RSS” template option.

dashcode-chooser.png

3) Edit the RSS parameters, setting the feed URL to your blog feed (or any feed you’d like!)

dashcode-settings.png

4) Customize the look and feel of the blog display using the type of fancy visual editor… you can change the entire color scheme, fonts, spacing and more.

dashcode-designer.png

5) Press play to preview and test your blog app in the iPhone Simulator

headlines.png

6) Export your dashcode project to disk and/or publish it to a public web server. Since my blog lives at OpenIdeals.com, I placed my iPhone web app at http://openideals.com/iphone

7) Download the super sweet PhoneGap application framework via http://phonegap.com or just get the ZIP Archive directly

8) Open the archive, navigate to the “iPhone” folder and then run the “Glass.xcodeproj” xcode project (duh?) file. It should be the only “blue” file in the folder.

9) Find the “url.txt” file in the “Groups & Files” explorer. Change the url link in this file to the location of your Dashcode blog app (again, mine is at http://openideals.com/iphone)

xcodephonegap.png

10) Press the “Build and Go” green button in Xcode to launch your native application in the iPhone Simulator

launcher.png
(see the “OpenIdeals” icon with my face on it?!)

From here, you can modify the icon.png and Default.png (splash screen) until you are satisifed with the outcome of how your app looks. Also the “Info.plist” file controls the name of your application in the iPhone launcher.

splash.png
(this is my splash screen that stays up for a few seconds upon app launch…)

At this point, you should have your blog running as a native application in the iPhone Simulator. To actual get this application out to the world, you’ll need to pay Apple $99 to join their Developer Program, as well as jump through many hoops to get all the security keys and permissions to distribute your application.

Otherwise, you can also just point people with iPhones or iPod Touches directly to your mobile application URL… that would work, too!

Final note on the amazing PhoneGap – they also support native application web wrapping for Android and Blackberry, as well as a bunch of other features like determining the device GPS location via Javascript calls.

That is all for this post… I hope you found it useful and to the point. I may do a similar one for Android + Eclipse, especially for all the non-Mac OS users out there.