I’m going to get down to business here without too much editorializing. The only prereq is that you have an Intel-based Mac and a medium level of skills with text editors or visual web page designers. You don’t need to know how to write Objective C or any other complex “Native App” skills. I’ll take you step-by-step through a simple process for putting together a number of free tools and technologies in order to bring your blog (or any other RSS-based feed of content) to the iPhone or iPod Touch in a super cool and quick way.
1) Download and install the iPhone Development SDK: http://developer.apple.com/iphone/
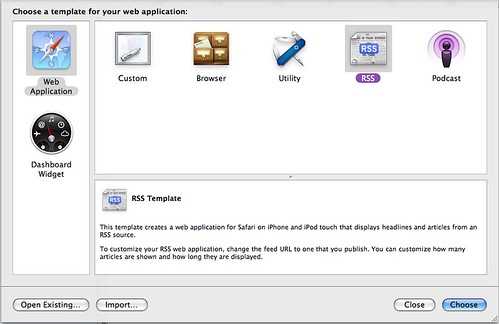
2) Launch the Dashcode application and select the “RSS” template option.
3) Edit the RSS parameters, setting the feed URL to your blog feed (or any feed you’d like!)
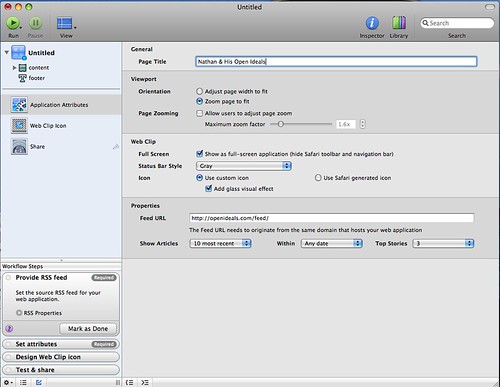
4) Customize the look and feel of the blog display using the type of fancy visual editor… you can change the entire color scheme, fonts, spacing and more.

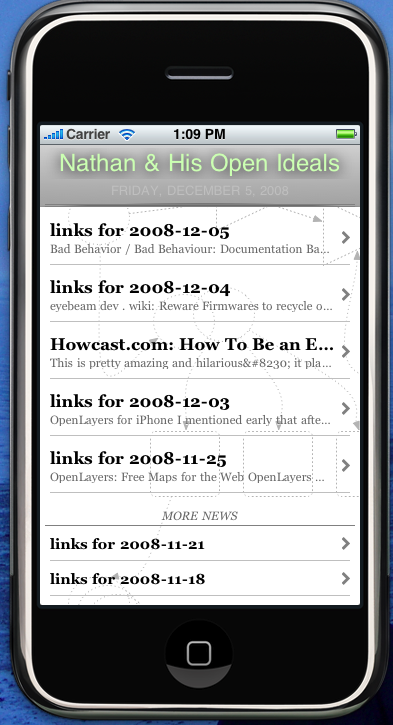
5) Press play to preview and test your blog app in the iPhone Simulator
6) Export your dashcode project to disk and/or publish it to a public web server. Since my blog lives at OpenIdeals.com, I placed my iPhone web app at http://openideals.com/iphone
7) Download the super sweet PhoneGap application framework via http://phonegap.com or just get the ZIP Archive directly
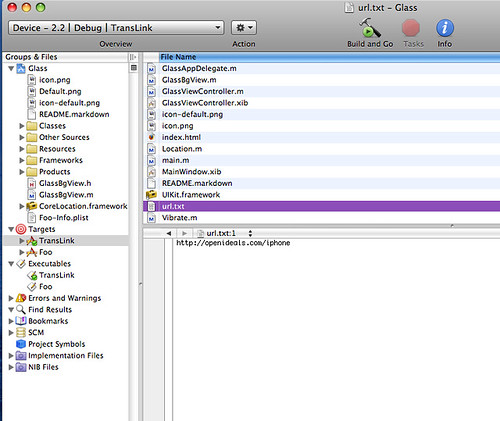
8) Open the archive, navigate to the “iPhone” folder and then run the “Glass.xcodeproj” xcode project (duh?) file. It should be the only “blue” file in the folder.
9) Find the “url.txt” file in the “Groups & Files” explorer. Change the url link in this file to the location of your Dashcode blog app (again, mine is at http://openideals.com/iphone)
10) Press the “Build and Go” green button in Xcode to launch your native application in the iPhone Simulator
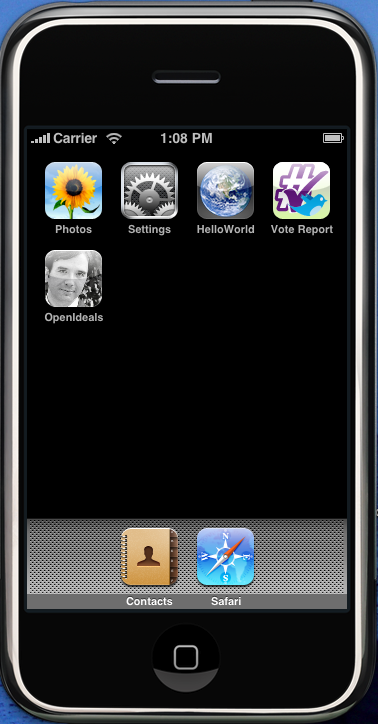
(see the “OpenIdeals” icon with my face on it?!)
From here, you can modify the icon.png and Default.png (splash screen) until you are satisifed with the outcome of how your app looks. Also the “Info.plist” file controls the name of your application in the iPhone launcher.
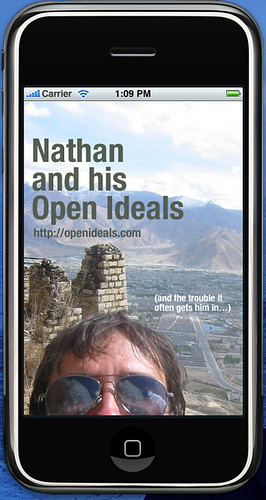
(this is my splash screen that stays up for a few seconds upon app launch…)
At this point, you should have your blog running as a native application in the iPhone Simulator. To actual get this application out to the world, you’ll need to pay Apple $99 to join their Developer Program, as well as jump through many hoops to get all the security keys and permissions to distribute your application.
Otherwise, you can also just point people with iPhones or iPod Touches directly to your mobile application URL… that would work, too!
Final note on the amazing PhoneGap – they also support native application web wrapping for Android and Blackberry, as well as a bunch of other features like determining the device GPS location via Javascript calls.
That is all for this post… I hope you found it useful and to the point. I may do a similar one for Android + Eclipse, especially for all the non-Mac OS users out there.