Searching and Playing YouTube Videos using Appcelerator Titanium

This tutorial is part of content I am developed for the NYU ITP course I am teaching this semester, “Social Activism using Mobile Technology”. You can find the original document posted here. This code comes from the open-source project (of which I am the lead developer) located here: http://github.com/nysenatecio/NYSenateMobileApp. If you want to see this code “in action”, download the NYSenate Mobile app for iPhone, iPad or Android.
This tutorial will demonstrate using the Appcelerator Titanium Mobile API, a Javascript-based cross-mobile-platform toolkit, how to accomplish the following feats in a mobile app:
  • Search for video by channel name or keyword from the YouTube API
  • Use the Titanium HTTP client for async XML requests and response handling
  • Retrieve video results from YouTube and display thumbnail & text in a table
  • Create a WebView window and use it to display YouTube video player
  • Hand-off YouTube video links to the OS for external playback

All in all, following this tutorial, you should be able to perform the basic functions you would need to build an app that front-ended video content stored on YouTube.

First, we declare our variables:

//this is the main app window

var win = Titanium.UI.currentWindow;
//this creates a spinning widget we can display while the user waits

var toolActInd = Titanium.UI.createActivityIndicator();
//this is the table we will load videos into

var tableview;
//and the data array for the table

var data = [];
//the window and webview for displaying youtube player (iOS only)

var webModal;

var webModalView;
//stores the current link being displayed in the web view

var currentLink;
//this is the network request object

var xhr = Ti.Network.createHTTPClient();

Now you need to declare a function that knows how to play YouTube videos on iOS and Android. Every YouTube video has a GUID (globally unique id – or at least unique for YouTube) and a title. You pass those two values to this function and it will either launch the YouTube player directly (Android) or display a thumbnail with playbutton that the user can launch (iOS).

function playYouTube (vtitle, vguid)
{
if (Titanium.Platform.name == ‘iPhone OS’)
{
var ytVideoSrc = “http://www.youtube.com/v/” + vguid;
var thumbPlayer = ‘<html><head><style type=”text/css”> body { background-color: black;color: white;} </style></head><body style=”margin:0″><br/><br/><center><embed id=”yt” src=”‘ + ytVideoSrc + ‘” type=”application/x-shockwave-flash” width=”100%” height=”75%”></embed></center></body></html>’;

showHTMLContent(vtitle,’http://www.youtube.com/watch?v=’ + vguid,thumbPlayer);
}
else //on android
{
//this call to openURL hands off the link to the operating
//system, and starts any player that supports youtube.com
Titanium.Platform.openURL(‘http://www.youtube.com/watch?v=’ + vguid);
}
}

The reason you show an embedded YouTube thumbnail player on iOS, is that it will allow the video to play inside of the app without leaving the context of the app. This was more a problem on the non-multitasking iOS 3.x, and is still an issue on the iPad until iOS 4.2.

In the function above, there is a showHTMLContent() function call. This function is not built-in, and is just a way to simplify the common need to show some bits of HTML markup within your app. The arguments for the function are a title of the page, an optional URL to the source content of the page, and the direct HTML markup content to display.

function showHTMLContent(wTitle, wUrl, wHTMLContent)
{

//store the link for later use
currentLink = wUrl;

//create the window to hold the web view
webModal = Ti.UI.createWindow({});

//set the orientation modes for basically any which way
webModal.orientationModes = [
Titanium.UI.PORTRAIT,
Titanium.UI.LANDSCAPE_LEFT,
Titanium.UI.LANDSCAPE_RIGHT
];

//create the webview aka the embedded web browser (webkit/safari)
webModalView = Ti.UI.createWebView();
webModalView.scalesPageToFit = true;

//add the web video to the modal window
webModal.add(webModalView);

//set the title of the window
webModal.title = wTitle;

//if you are using a tab UI in the app, this will open the window
Titanium.UI.currentTab.open(webModal,{animated:true});

//set the HTML to display to the markup passed into the function
webModalView.html = wHTMLContent;

};

Great, so now we have the ability to display a YouTube player within our app using an embedded WebView. Pretty awesome so far, and hopefully you see how might use components like WebView for other mashups of native and web content in your apps.

Now we need to demonstrate how to get the data from YouTube on what videos are available. For this, we create another function called “doYouTubeSearch()”. This function takes two parameters: you can specify the channel name to retrieve videos from, or you can specify a search term, and you can combine these as well, to search videos from a specific channel only.

function doYouTubeSearch (channel, searchTerm)
{

//first show a “loading” spinning indicator to the user
toolActInd.message = ‘Loading videos…’;

win.setToolbar([toolActInd],{animated:true});

toolActInd.show();
//create the YouTube API search URL from the function parameters
var searchUrl = ‘http://gdata.youtube.com/feeds/api/videos?alt=rss&author=’ + escape(channel) + ‘&q=’ + escape(searchTerm) + “&orderby=published&max-results=25&v=2”;

//use the xhr http client object to do an HTTP GET request to the URL
xhr.open(“GET”,searchUrl);
xhr.send();
}

That was all pretty straightforward, right? You build up a URL, and you make the request using it for data from YouTube. Now, how you receive the response to that request is our next step. To do this, you must define an “onload” function for the ‘xhr’ object.

It is in this function that you will receive the data back from YouTube (usually in JSON or XML format), and you can process it to display in your app.

xhr.onload = function()
{
try
{

//the doc object holds the response structure

var doc;

//check whether the data coming back is in XML format or not

if (!this.responseXML)
{
//if not XML you have to convert it to XML
doc = Titanium.XML.parseString(this.responseText).documentElement;
}
else
{
//if it is XML, then just set the doc variable
doc = this.responseXML.documentElement;
}

//now we can easily get a list of items from teh results
var items = doc.getElementsByTagName(“item”);

//some simple variables for tracking the loop
var x = 0;
var c;

//now just loop through the response array to see what videos we have

for (c=0;c<items.length;c++)
{
//get the current item
var item = items.item(c);

//get the text for the video title tag using standard DOM XML calls
var title = item.getElementsByTagName(“title”).item(0).text;

//build up a summary string to display below the title
var summary = “”;
if (item.getElementsByTagName(“pubDate”))
{
summary = item.getElementsByTagName(“pubDate”).item(0).text;
}

//get the link to the youtube video
var link = “”;

if (item.getElementsByTagName(“link”))
{
link = item.getElementsByTagName(“link”).item(0).text;
}

//now here is where we perform a trick
//we find the GUID code from within the link b/c we know the link format
var guid = link.substring(link.indexOf(“?v=”)+3);
guid = guid.substring(0,guid.indexOf(“&”));

//now we can use that guid to load up a thumbnail image
var thumbnail = “http://i.ytimg.com/vi/” + guid + “/2.jpg”;

//okay we have all the data we need for that item
//now we need to create a row to add to the table in order to display it

//create the row item and set the height to 80 pixels
var row = Ti.UI.createTableViewRow({height:80});

//set parameters for the row so we can get the youtube data out later
row.url = link;
row.guid = guid;
row.videotitle = title;

//create a label for displaying the title and add it to the row
var labelTitle = Ti.UI.createLabel({
text:title,
left:105,
top:10,
height:40,
font:{fontSize:16}
});
row.add(labelTitle);

//create a label for the summary and add it to the row
var labelSummary = Ti.UI.createLabel({
text:summary,
left:105,
top:45,
font:{fontSize:12}
});
row.add(labelSummary);

//create an image from the thumbnail, and add it to the row
var img = Ti.UI.createImageView({
url:thumbnail,
left:0,
height:80,
width:100
});
row.add(img);

//add the row to the data array
data[x++] = row;

}

//if tableview has been created, reset the data on the table
//you can update data on the table multiple times
if (tableview)
{
tableview.setData(data);
}
else
{

//if table has not been created, build it up with the data array
tableview = Titanium.UI.createTableView({
data:data
});

//add the table to the current window for display
Titanium.UI.currentWindow.add(tableview);

//add a ‘click’ listener so that when someone taps on a row
//the video will be played using the function we defined earlier
tableview.addEventListener(‘click’,function(e)
{
playYouTube(e.row.videotitle,e.row.guid);
});

}
}
catch(E)
{
//if anything bad happens, show the error to the user and log it
Titanium.API.debug(E);
Titanium.UI.createAlertDialog({title:’NY Senate’, message:’No videos were found for this search.’}).show();

}

//hide the spinning ‘loading’ widget
toolActInd.hide();
win.setToolbar(null,{animated:true});
};

Okay, so that was a lot I know, but go back through it a few times, and you will see it is not so hard. First, we get XML back from YouTube. Then, we turn that XML into an array of items. Them we loop through those items and build up an array of rows. Then, we set the table with that array, and display the table. Finally, we handle the ‘click’ or touch events on the row, and display the YouTube player in the embedded webview. Ta-da! You now have a customizable YouTube search and player app.

Now here are three examples how you might kick off all this activity.

First, in this case, we are doing a search for any video in the ‘NYSenate’ YouTube channel.

doYouTubeSearch(‘NYSenate’,”);

In this example, we are searching all of YouTube for a “skateboard dog”.

doYouTubeSearch(”,’skateboard dog’);

Finally, in this example, we are

doYouTubeSearch(‘NYSenate’,’Brooklyn’);

In review, this lesson has showed you how to display HTML web content, how to create YouTube players embedded in that content, how to make HTTP requests to web services and APIs, how to parse the XML returned from those services, and how to display data in a Table format.

This example was built upon code that comes from the open-source project located here: http://github.com/nysenatecio/NYSenateMobileApp so go grab the code there and use it as a basis of your own app!
Turn Your Blog Into a Native iPhone App in 10 Steps

I’m going to get down to business here without too much editorializing. The only prereq is that you have an Intel-based Mac and a medium level of skills with text editors or visual web page designers. You don’t need to know how to write Objective C or any other complex “Native App” skills. I’ll take you step-by-step through a simple process for putting together a number of free tools and technologies in order to bring your blog (or any other RSS-based feed of content) to the iPhone or iPod Touch in a super cool and quick way.

1) Download and install the iPhone Development SDK: http://developer.apple.com/iphone/

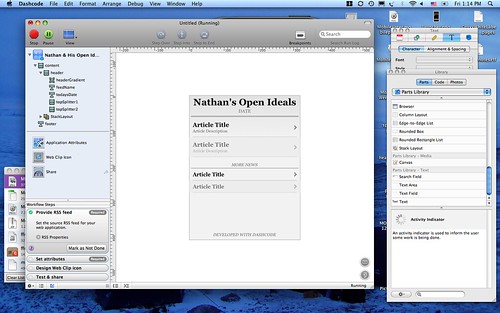
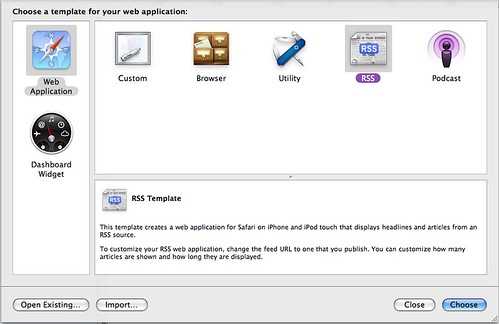
2) Launch the Dashcode application and select the “RSS” template option.

dashcode-chooser.png

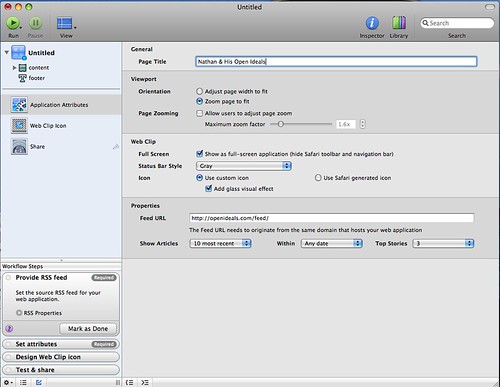
3) Edit the RSS parameters, setting the feed URL to your blog feed (or any feed you’d like!)

dashcode-settings.png

4) Customize the look and feel of the blog display using the type of fancy visual editor… you can change the entire color scheme, fonts, spacing and more.

dashcode-designer.png

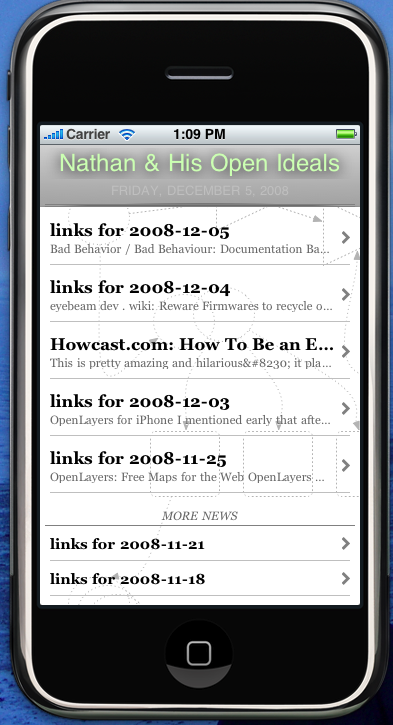
5) Press play to preview and test your blog app in the iPhone Simulator

headlines.png

6) Export your dashcode project to disk and/or publish it to a public web server. Since my blog lives at OpenIdeals.com, I placed my iPhone web app at http://openideals.com/iphone

7) Download the super sweet PhoneGap application framework via http://phonegap.com or just get the ZIP Archive directly

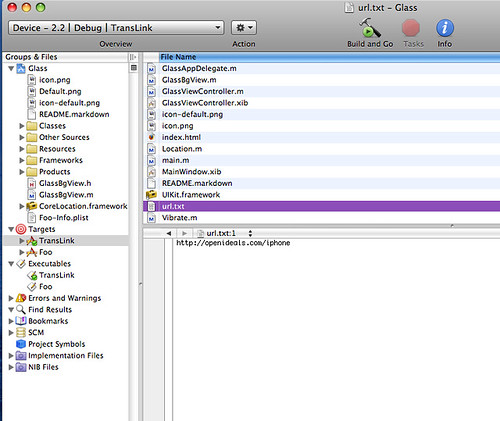
8) Open the archive, navigate to the “iPhone” folder and then run the “Glass.xcodeproj” xcode project (duh?) file. It should be the only “blue” file in the folder.

9) Find the “url.txt” file in the “Groups & Files” explorer. Change the url link in this file to the location of your Dashcode blog app (again, mine is at http://openideals.com/iphone)

xcodephonegap.png

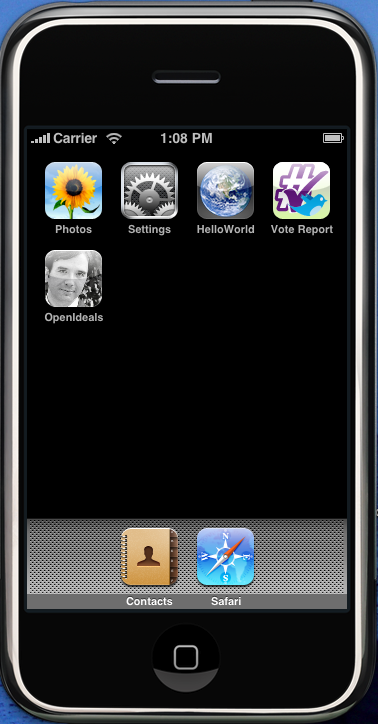
10) Press the “Build and Go” green button in Xcode to launch your native application in the iPhone Simulator

launcher.png
(see the “OpenIdeals” icon with my face on it?!)

From here, you can modify the icon.png and Default.png (splash screen) until you are satisifed with the outcome of how your app looks. Also the “Info.plist” file controls the name of your application in the iPhone launcher.

splash.png
(this is my splash screen that stays up for a few seconds upon app launch…)

At this point, you should have your blog running as a native application in the iPhone Simulator. To actual get this application out to the world, you’ll need to pay Apple $99 to join their Developer Program, as well as jump through many hoops to get all the security keys and permissions to distribute your application.

Otherwise, you can also just point people with iPhones or iPod Touches directly to your mobile application URL… that would work, too!

Final note on the amazing PhoneGap – they also support native application web wrapping for Android and Blackberry, as well as a bunch of other features like determining the device GPS location via Javascript calls.

That is all for this post… I hope you found it useful and to the point. I may do a similar one for Android + Eclipse, especially for all the non-Mac OS users out there.

Functional About Card – a better business card?

This morning, upon realizing my old business cards were mostly out of date, I decided to design a new card. I pulled up the most excellent Apple Pages and started designing away… now they have some nice built-in templates, but the problem is that you always end up with something you can’t easily manufacturer in the comfort of your own home. I’ve gone through a few sets of Moo cards, but I’ve grown weary of them a bit, as they just seem to disappear so quickly and aren’t that cheap. I looked at my stack of paper next to the printer, and noticed some index cards I had bought for recipes, D&D and perhaps a little-used Hipster PDA. In that moment, I was struck with a minor inspiration, which resulted in the work below… though its up to you to decide, of course, how productive my morning actually was.

Introducing… the Functional About Card (fāc)!
The Functional About Card (fāc) is a business card format & template that prints on 3×5 index cards in the color of your choice (Office Depot 500 pack on Recycled Paper for $2.89). The goal was to create a business card that can be easily produced on demand with a home printer, and is actually useful and functional, as opposed to the usual dead tree spam you usually get that just collect dust.

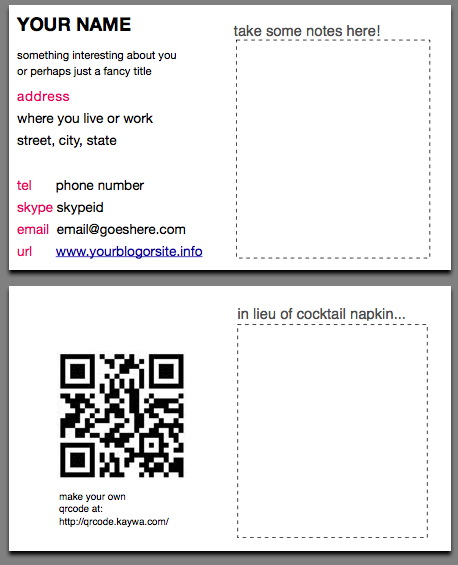
Functional About Card layout

The card design is two-sided, comprised of four 2.5×3″ quadrants:

  • a read-only information quad providing your critical stats (name, title, email, charisma, hit points)
  • a writeable, line-ruled quad where recipients of your card can take notes on things you’ve said, or perhaps what others have said about you. this area can also be torn off (see ‘scoring’ info later) and used for exchanging numbers or stock tips
  • a visual quad for displaying geeky things like QRCodes, avatars, creative commons badgets and so on
  • a blank “scratchpad” quad for brainstorming, mind mapping, UML sequence diagrams or maps for meeting up later in the evening

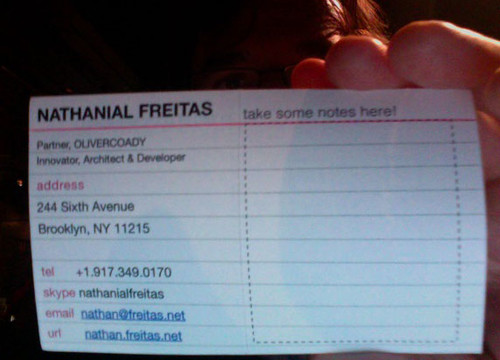
Functional About Card - Front View

You could optionally replace the note-taking area on the right with a maze, crossword puzzle, madlib or other small format, amusing game. Anyone you give you a card to will be delighted later when they discover that you’ve actually given them something fun to pass the time.

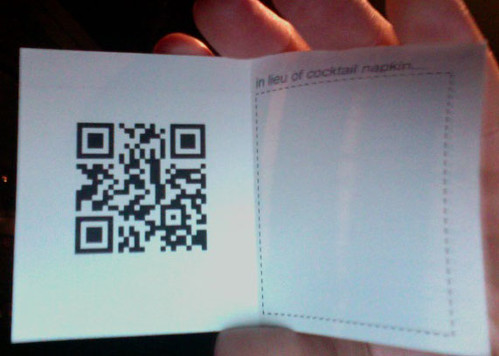
Functional About Card - Back View

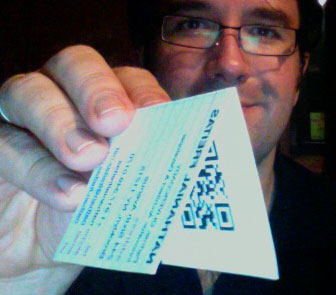
I’ve chosen to use the back side to display a QRCode, but if that is just way too geeky for you, feel free to put a picture of yourself, your pet, your favorite flower or historical figure (Ben Franklin!). You might also expand the right “idea napkin” area to the whole card, because admittedly, 3×2.5″ isn’t much room for a great idea.

Functional About Card - the fold

Make sure to lightly score (with a screw driver, razor blade or exact knife) and fold the card down the middle of the long length… this way it fits nicely into wallets, pockets and other places people typically put these things. This also makes the card a bit easier to tear evenly in half, in case it needs to be used as a part of a sneaker net data transmission.

Download the template in Apple Pages, PDF and MS Word formats: FunctionalAboutCard-1.0.zip

Oh, yeah, and this template has been released under the Creative Commons By Attribution 3.0 license.

Creative Commons License
Functional About Card by Nathanial Freitas is licensed under a Creative Commons Attribution-Share Alike 3.0 United States License.
Based on a work at openideals.com.
Permissions beyond the scope of this license may be available at http://openideals.com.

So, there it is… I hope you love it, and if not, that you’ll provide some useful suggestions and improvements upon this flight of fancy.